
Closed Captioning in Zoom
To get started with using Closed Captioning in your meeting, you must first enable this setting for the first time in the Zoom Web Portal. Only the host can assign someone to type Closed Captions, and only one participant can be assigned during the meeting.
Turning On Closed Captioning
Choosing Who Will Type
Accessing Your Closed Captions After the Meeting
Useful Notes
Turning On Closed Captioning
Please note: This is enabled by default on all Otago Zoom accounts, so the steps below can be skipped, however if it is not enabled on your account for some reason, please do the following:
Step 1: Sign into your Zoom Web Portal (link here: Install and Sign into the Zoom App)
Go to https://otago.zoom.us/profile
Sign in with your University of Otago credentials, via the “Sign in with SSO” option.
Step 2: Change your Settings to allow Closed Captioning in your meetings
On the left hand panel, click on Settings
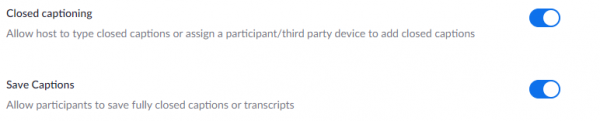
With the Meeting Tab selected, scroll down until you see an option for “Closed Captioning” (you can scroll, or go straight to this by “searching the page” – use shortcut Ctrl+F, then type in “closed captioning”. This should highlight and jump you to the correct part of the page.
Ensure that the setting is turned ON (See screenshot below)
Now, when you start a meeting, you will see the “Closed Caption” option on the bottom of the Zoom window.

Choosing Who Will Type
A participant
If you have organized with someone in your meeting to type notes during the session, then you can choose this option once they have joined the meeting, and designate this person to type closed captions.
Note: You should always double check with the person before assigning them to type closed captions.
I will type
If you want to type notes for participants to be able to access at the conclusion of your meeting, or if you are the Host for a meeting where you are not the presenter (and are confident in your typing abilities!) you could choose to type the closed captions yourself.
Copy the API Token
Some third party software have integration with Zoom and can perform live transcriptions of speech to closed captions. The API token allows the software to access the meeting audio, and caption the speech live. While this method does do much of the work of closed captioning the meeting, it is prone to making errors. It is recommended that you proofread and edit the captions after the meeting to ensure that the text is accurate.
Currently, the University of Otago and eConferencing do not support any of these third party providers.
After the Meeting
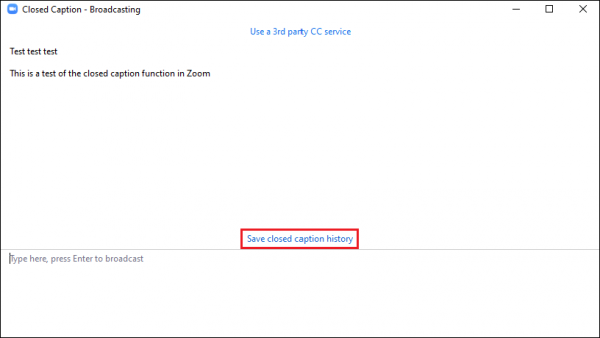
Before the meeting has ended, you can save a file with the closed captions to your computer by selecting: “Save closed caption history”.


Useful Notes
Note: only one person can be assigned to type Closed Captions in the Zoom Meeting. If you are using Breakout Rooms in your meeting, be aware that you cannot assign any more participants to type Closed Captions.