
Automatically Transcribe your Zoom Recording
Zoom allows for automatic transcription on meetings that are recorded to the cloud. To find out more about enabling cloud recording, please see the following page: Recording to the Cloud.
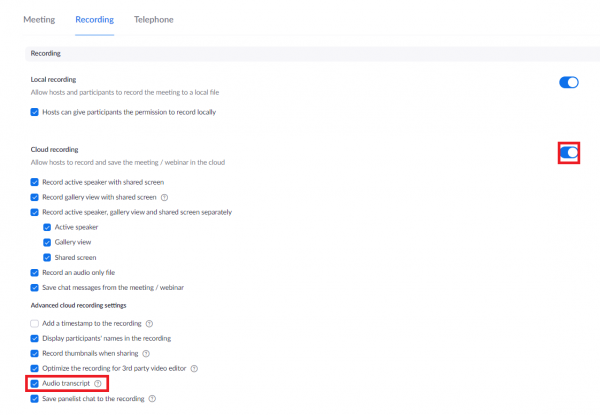
To enable automatic transcription, you will need to enable both Cloud recording and Audio Transcript in your Zoom profile online. Go to otago.zoom.us, sign in with your university credentials, then go to your Settings.
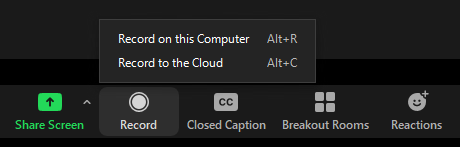
Once you have enabled cloud recording and audio transcript, host your Zoom meeting, then left-click the Record icon on the Meeting Controls. Choose “Record to the Cloud” when you’re ready to start your meeting.
Once the meeting has ended, or you manually stop the recording, Zoom will process the recording before making it available to you to access. At this point, Zoom will send you an email confirming that your recording is available online and give you a link to it.
![]()
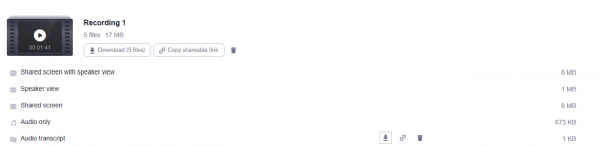
Click the link in your email to be taken to your Cloud Recordings folder on Zoom web. In this list, will be a file called “Audio transcript”. Hover your mouse over this, and a download icon will appear (highlighted in red below). Click the icon to download your audio transcript.
![]()
Once the audio transcript file has been opened, you should open in Notepad (on Windows computers) or TextEdit (on Mac computers).
Note: There may be some errors that occur in automatic transcription which can be worsened by factors such as poor audio quality on the speaker’s end. However, the audio transcription should be mostly accurate, and you can edit the transcription file if you notice these errors by using either TextEdit or Notepad.