Aligning and adjusting images using photoshop: Core scan example
1 About this approach
In this approach we use photoshop to align images and make image brightness, contrast and other adjustments. These instructions are written for photoshop CS6, but they should be applicable to other recent versions of Photoshop.
This approach has these advantages over aligning images in adobe illustrator or other vector package:
- Opportunity to automatically align images
- Ability to make image brightness, contrast and other adjustments live (and reversibly)
- Ability to make granular image adjustments (i.e. at the edges of aligned images to make them match better).
Focus stacking images using macro or stereomicro photography equipment and Zerene stacker
This article has been specifically written for using the macro-photography setup or the stereomicroscope setup in the Imaging Lab (formerly called the Graphics Lab) in the geology department. Instructions are for using Zerene stacker to stack the images rather than photoshop because it is faster, easier and produces better results in all cases that I have seen. For example Zerene Stacker took 72s to stack 11 images and photoshop took 125s, the difference in stacking speed is even more pronounced when more images are used.
This post supersedes the previous focus stacking post I wrote which recommended using photoshop.
Focus stacking images
This article has been specifically written for using the macro-photography setup in the Graphics Lab in the geology department and Adobe Photoshop CS5. Concepts are applicable to other equipment and versions of Photoshop.
UPDATE:
I have made a new post with instructions using Zerene stacker to stack the images rather than photoshop because it is faster, easier and produces better results in all cases that I have seen. For example Zerene Stacker took 72s to stack 11 images and photoshop took 125s, the difference in stacking speed is even more pronounced when more images are used.
Aligning multiple images in photoshop
We want images stacked
Sometimes we capture images of the same area (e.g. a particular part of a thin section) using different conditions (reflected light, PPL, XPL, Cathodoluminescence) . We may then want to stack the images together so that we can see how each different mineral, for instance, appears under the different conditions.
THE PROBLEM
We can align objects manually because we see recognisable features in each image. It can be a little tedious and difficult trying to add, manually align, resize and rotate the images in software like: Adobe Illustrator, photoshop, the gimp, image j or other software.
There is a semi-automated way to speed up this process in photoshop. I’m not sure of the exact conditions under which this will actually work. But it’s fairly easy to try and could save you a load of time.
How to do it
The first thing we need to do is to load all the images as layers in a photoshop document.
- Open photoshop
- Go to file>Scripts>Load files into Stack
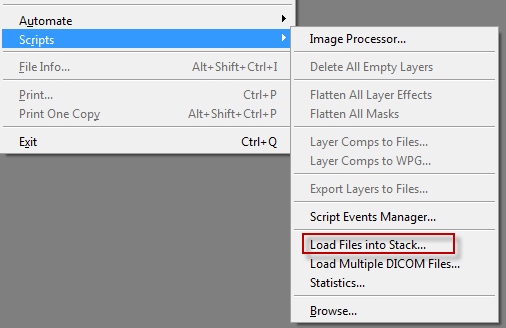
- Navigate to the folder with your images in it and load these.
You should now see all your images as layers in photoshop with names corresponding to file names (handy eh?).
- Select all the layers by clicking on the top layer and then shift clicking on the bottom layer. They should all have a blue background in the layers panel indicating they are all selected.
- Now go to edit>auto-align layers
- I recommend trying collage first which will not distort the image.
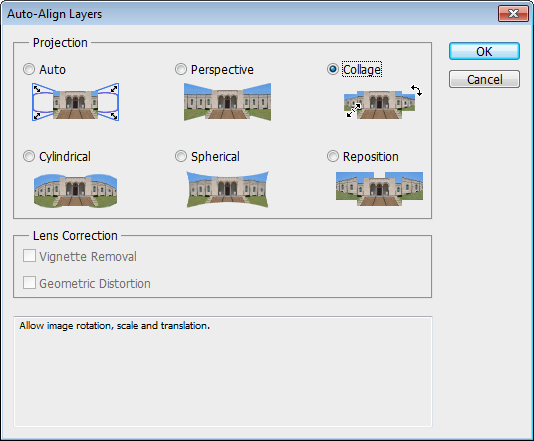
Thanks to Steve Kidder for working this out with me.
Macro-photography setup
The macro-photography setup in the Geology Department, University of Otago, comprises: a copy stand, a DSLR camera with a macro-lens and a computer for controlling the camera and capture.
What is it for?
Taking photos of samples, specimens etc. close up. The setup has a maximum field of slightly smaller than an A4 sheet of paper. The smallest field of view is the size of the sensor: 22.2*14.7mm. Because you can capture 4272 x 2848 (L) pixels on this 22.2*14.7mm sensor your pixel density is 4888 ppi. This is much more than the 300ppi needed for print, so digital zooming and cropping will get you a lot closer with good results (see sample images in poster below).

Guidelines for use of the macro-photography setup. This poster is beside the equipment.
