
Aligning and adjusting images using photoshop: Core scan example
1 About this approach
In this approach we use photoshop to align images and make image brightness, contrast and other adjustments. These instructions are written for photoshop CS6, but they should be applicable to other recent versions of Photoshop.
This approach has these advantages over aligning images in adobe illustrator or other vector package:
- Opportunity to automatically align images
- Ability to make image brightness, contrast and other adjustments live (and reversibly)
- Ability to make granular image adjustments (i.e. at the edges of aligned images to make them match better).
1.1 A note on Scans vs. photos
The input for this is a core scan, which means there shouldn’t be any lens distortion which would be present in a photo. If you were taking photos, a good approach would be to use Structure from Motion (SfM, sometimes called photogrammetry) to generate an ortho image from multiple photos from above. A good package for this is agisoft photoscan.
2 Preparing the images
It’s a good idea to work out, up front, what target pixel count (resolution) you need for your final product. Aim for 300ppi in print and no more than 20,000 pixels in any direction. For example if you are aligning 4 images and you want an image that will display A4 portrait it should be ~3500 pixels high and each image should be about 1000 pixels high (depending on overlap). See also:
If your original images are large or there are many originals you may want to resample before you put them into Photoshop to align.
2.1 Reducing the pixel count by resampling.
The fastest way to do resampling on a bunch of images is to set up a script in photoshop. There are detailed instructions on the web covering photoshop scripting. The basic approach is:
- Open actions panel
- Create and start recording a custom action
- Adjust the image size using % (so that each image is reduced by the same amount) to match your output.
- Stop recording.
- Go to File>automate>Batch
- Select your action
- Select the “open folder” containing your images
- Select the output folder
- Run the action
TIP: I recommend processing all your images through two folders you create: One called script in and one called script out. This makes it easier to keep track of what you are doing to your images and saves time selecting folders etc.
3 Aligning the images
Now that you have your suitably sized images it is time to align them in photoshop. It’s worth a go trying to automatically align the images. But if this doesn’t work they can be manually aligned.
3.1 Automatic alignment.
- Go to File>Automate>Photomerge and select the images you want to align.
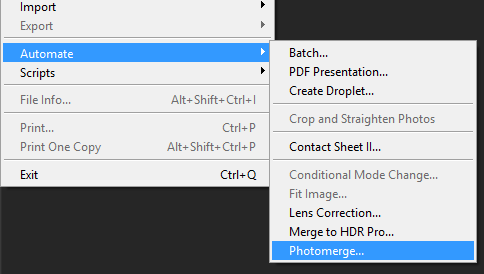
- If these images are scans you should only need to reposition them to get them in the right place. So check the Reposition option.
- Uncheck Blend Images Together. If we need to manually align and adjust colours this makes it more difficult.
- Click OK and wait for a bit
- Your images will be loaded each into a separate layer.
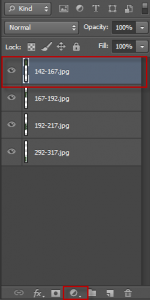
- Check the alignment by looking at the layers panel.
- You can also use the Move tool in auto select mode to click on the image and see which layer that part of the image is in.
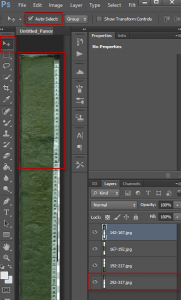
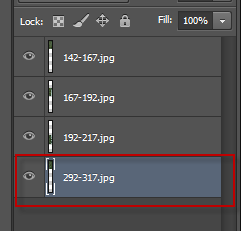
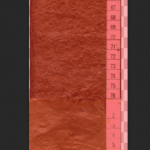
- In our case three of the four images have aligned correctly and 292-317.jpg has not aligned properly.

3.2 Manual alignment to fix up auto alignment
In the example above we have one image to fix up the alignment.
- You will probably need to make space for putting in the manually aligned images.
- Go to Image>Canvas Size
- Change the units to pixels
- Set the anchor to top left (or wherever your correctly aligned images start from)
- Add enough pixels to the height and/or width for your manually aligned images.
- It’s probably a good idea to add some pixels to one side for putting your unaligned images while you move them all about.
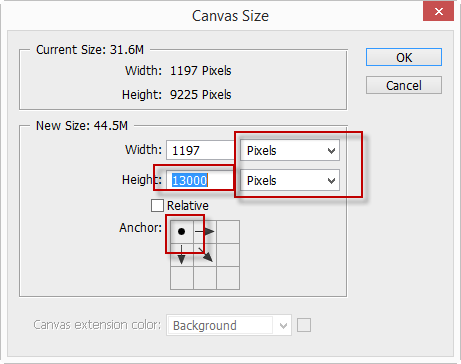
- Click OK
- Select the layer you want to move in the Layers panel
- Make the Move tool active and turn off Auto select (so that you can select just the layer to move)
- Move the layer to the correct location.
- Save the image in Photoshop document format.
TIP: If you have a few images to move you can switch the Move tool to Auto Select mode once you have all the images out from behind each other.
3.3 Complete manual alignment (alternative to auto alignment)
Sometimes the auto alignment is so bad that it actually makes it harder to align manually after. In which case you can completely align the images manually.
- Go to file>Scripts>Load files into Stack
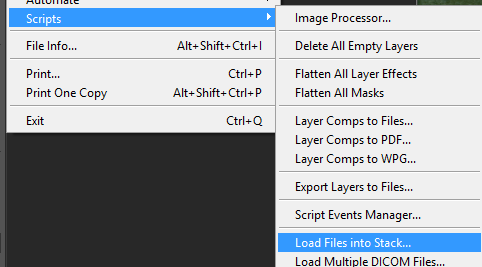
- Select the files to align.
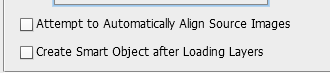
- Make sure both the boxes are unchecked.
- Go to Image>Canvas Size
- Change the units to pixels
- Set the anchor to top left
- Add enough pixels to the height and/or width for your manually aligned images.
- Add some pixels to one side for putting your unaligned images while you move them all about.
- Click OK
- Use the move tool with or without Auto-Select checked to get your images aligned. Use the extra space to put un-aligned images while you work on the rest.

- Crop the extra space away at the end (don’t crop any of the image – you can always crop it for export, or if you must use a non-destructive crop).

- Save in photoshop format
3.4 Photomerge UI plugin
You can get an interactive photomerge plugin for CS5 32 bit version that can help with aligning images.
4 Adjusting the images
The best way to make adjustments (e.g. brightness, contrast, levels) is using an adjustment layer.
4.1 Adjusting the entire stitched image
In the example I am working on we want to make the whole image lighter.
- Click on the topmost layer (so that the adjustment layer is created above this).
- Click on Create fill or Adjustment layer in the bottom of the layer panel
- Choose Levels (for example)
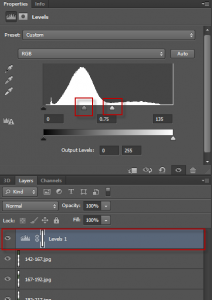
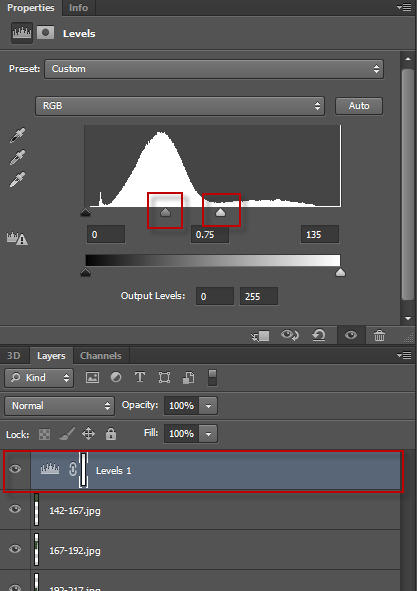
- With the levels adjustment layer selected you should see a Histogram in the properties box above.
- Adjust the settings on levels (e.g. the sliders) to set the output to what you want. This is completely reversible and adjustable.

4.2 Adjusting specific areas using masks
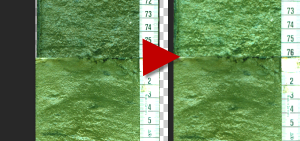
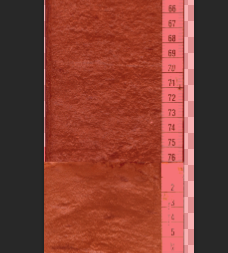
In this example we see a reasonably sharp brightness change between two of the images.
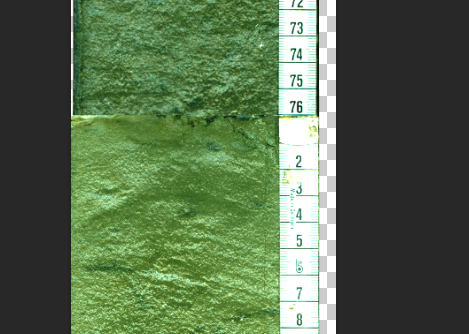
We can correct for this by targeting an adjustment to the image above using and masked adjustment layer. The mask we want will focus the change on the top image with a gradual reduction in change above so that we don’t just create a new sharp change. To achieve this we make a mask with a gradient over the area of interest.
Have a look online for more in depth discussion of how masking works.
- Create a new Levels adjustment layer underneath the one you just made.
- Double click and rename the layer e.g. to match the individual image you are working on
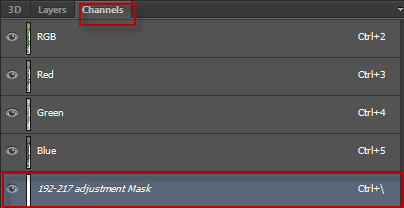
- Click on the Channels tab (next to layers)
- Make the Adjustment Mask visible. this makes the mask editable and visible by default as a translucent redT
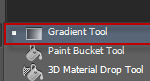
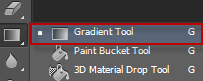
- Select the Paint Bucket Tool
 It should be in the following mode:

- Make sure Black is the foreground colour:

- Click the Paint Bucket tool anywhere on the Canvas. It should go red (it’s actually black but the mask previews as translucent red).
- Make a rectangular selection over the area you want to adjust.

- Make the Gradient tool active. Hidden under paint bucket
- With linear gradient selected drage from one side of the selection to the other to draw a gradient mask.

- Click on the adjustment layer (this hides the mask).
- Select>Deselect
- Zoom in on the area and adjust the levels until you match between the images.


DONE!
TIP: Turn visibility on/off the adjustment layers to see what you have done