This article has been specifically written for using the macro-photography setup or the stereomicroscope setup in the Imaging Lab (formerly called the Graphics Lab) in the geology department. Instructions are for using Zerene stacker to stack the images rather than photoshop because it is faster, easier and produces better results in all cases that I have seen. For example Zerene Stacker took 72s to stack 11 images and photoshop took 125s, the difference in stacking speed is even more pronounced when more images are used.
This post supersedes the previous focus stacking post I wrote which recommended using photoshop.
Background information
What is focus stacking?
Focus stacking is the process of stacking (combining) multiple images with different levels in focus into a single image that is “in focus”.
What controls depth of field?
There are several factors that affect Depth of Field (DOF). Most compact cameras have a far greater DOF than DSLRs. For DSLRs the primary factors are lens focal length, subject distance and Aperture size (f number).
- Focal length: The Macro photography setup in the Imaging Lab is a 50mm prime lens so we can ignore the effects of changing focal length.
- Camera to subject distance: the closer you are to a subject the narrower the depth of field.
- Aperture size: The smaller the aperture size (greater f number) the greater the depth of field.
For more information look at the Wikipedia article on Depth of Field
When do you need to focus stack?
You may need to focus stack when you are trying to take a photo of something with a lot of relief, i.e. distance between the front of the object and the back when viewed from the camera. The most typical situation is photographing a small (cm-sized) specimen (e.g. a small brachiopod) that has depth on the order of its width/height when viewed in the orientation it needs to be photographed in (e.g. it’s roundish). Samples that are quite flat are usually ok.
Before attempting to focus stack
It’s a good idea to see if you can get enough depth of field by adjusting the f-number (aperture size) up to something like 20. Please note that image quality (e.g sharpness) does degrade with higher f numbers.
Another approach is to simply move the camera further away and then digitally crop the picture. This may be suitable if you don’t need a really high resolution image.
How to focus stack
The general process with focus stacking is to take a series of images that cover different focus levels. Then stack the parts of the image that are in focus together to make a single in-focus image.

Focus stacking. The images at the top each have a portion in focus. The final image at the bottom is a composite image.
Taking the photos using the Macro photography setup
The macro photography setup in the Imaging lab has a camera mounted on a copy stand and is controlled via a computer with the canon eos utility.
- Begin by getting the equipment up and running, frame your sample and get it in focus.
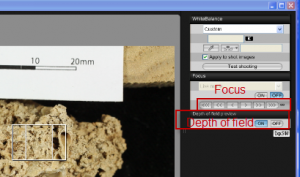
- At this point you should find an appropriate aperture value to use: a higher f number (smaller aperture size) will produce a larger depth of field but may reduce image quality (e.g sharpness). Use Depth of Field (DOF) preview and take a few test shots to see what an appropriate f number is (recommended value is up to 20).
- Switch to DOF preview in the controls on the right hand side of the main window(see image below). This shows you what depth of field you will get for a particular f-number.
- Beginning with the top of the sample in focus use the focus step buttons to work out how far you can step through to get to the next focus level but still have overlap between one image and the next. It might be that you click on the “>>>” arrow once to get good overlap.
- Beginning on the highest part of the sample take a photo move through the number of steps you worked out, take another one and so on.

If in doubt take more photos rather than fewer. Once you get a better feel for this you will be able to do it a bit more intuitively.
Taking the photos using the stereomicroscope setup
The stereo-microscope photography setup in the Imaging lab has a camera mounted on a copy stand and is controlled via a computer with the canon eos utility.
- Begin by getting the equipment up and running, frame your sample and get it in focus on the computer monitor at the top of the sample.
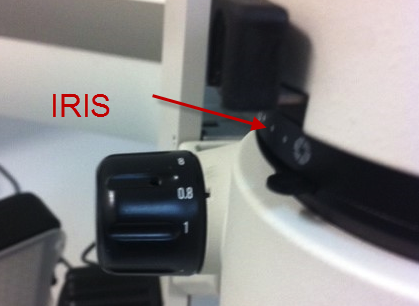
- You can close the IRIS to increase the depth of field. But you will get better results using the IRIS fully open and focus stacking more images.

- Beginning with the top of the sample in focus work out how far you need to turn the fine focus knob to get to the next focus level but still have overlap between one image and the next. Generally about one thumb width is about right at 1x magnification, smaller increments are required at higher magnification.
- Beginning on the highest part of the sample take a photo, then move the fine focus knob the required amount, take another photo and keep going until you are focusing on the base of the sample.
Focus stacking using Zerene Stacker
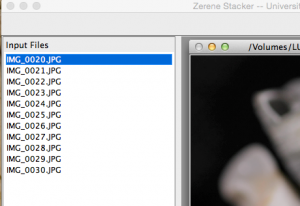
- Open Zerene Stacker

- Select the images you want to stack and drag them into the Input files area on the left hand side of the window
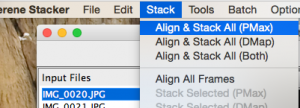
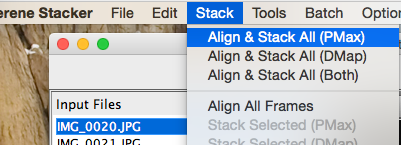
- Go to Stack>Align & Stack All (Pmax)
- When the process is finished you will see an output image listed in the bottom left.
- Go to File>Save Output Image(s) and choose where to save the image and whatever format you like.

More advanced and detailed methods of use are covered on the Zerene Stacker site:
