
Technical aspects of making figures
This page covers some important technical aspects of making figures such as: colour spaces, vector and raster file formats and compression.
A bit about colour
Our eyes have three types of cones that are sensitive to Red, Green and Blue light respectively.
RGB (Red, Green and Blue) colour space is used for screens where the colours produced are additive (e.g. if you add red and blue you get magenta). See diagram below.
CMYK (Cyan Magenta Yellow and Key=Black) colour space is used for print where light is reflected off the surface. This is known as the subtractive colour model because these CMY pigments subtract one primary colour. The subtracted colour is the one opposite on the CMYK diagram below (e.g. cyan subtracts red so we are left with green and blue (which add to make cyan in our brain)). Mixing on the subtractive colour model works like this: mixing CYAN and YELLOW removes blue and red so we are left with green. The K (Key) is black pigment, which is a more efficient and effective way to get blacks in print.
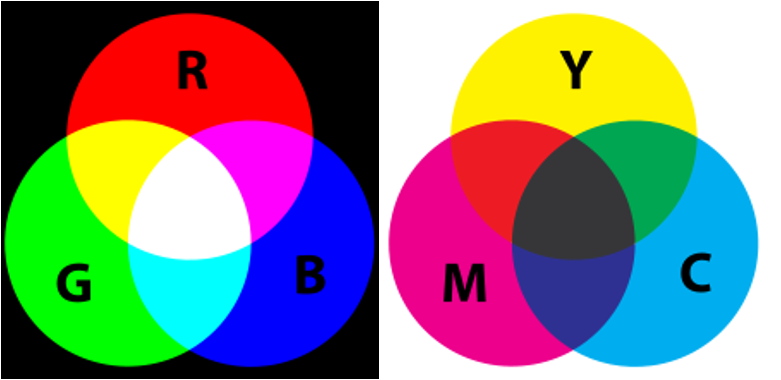
TRY THIS: Use a magnifying glass to examine the RGB figure above on the screen.
TRY THIS: Print out the figure above in colour and use a magnifying glass to see how the colours are produced.
Dealing with colour space
Here are a few things to look out for when dealing with colour space:
- What you see on the screen will not match exactly what you see in print. But it should be close.
- Some colours can be produced in CMYK that cannot be produced in RGB and vice versa (these are referred to as out of gamut). One thing to look out for in particular is colour ramps (gradations on graphs and figures between colours)
- Typically, you want to use RGB because most files we view on a screen. You might choose to use CMYK if your target output is print media.
Vector vs raster graphics
Vector graphics store information about how particular graphics objects are drawn. This information includes position, line width, fill colour etc. Vector graphics formats also allow inclusion of raster graphics objects.
Raster graphics, such as photos, store a grid of pixels (picture elements) with value/s for each pixel. For photos, this value will typically be a colour value in RGB format.
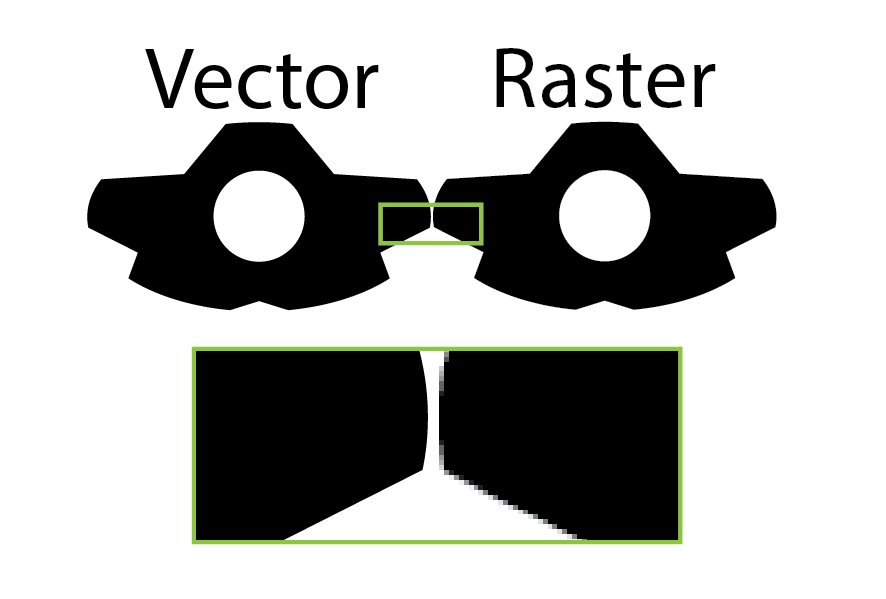
If you are not sure whether something is a vector or a raster the easiest way to check is to zoom in. Vector graphics scale so that they always look smooth, no matter how far you zoom in. Raster graphics become blocky (or sometimes blurry depending on the rendering method) when you zoom in. See the picture below or open up the PDF and zoom in to see the difference.
Vector graphics
These are some of the commonly used vector formats: .ps, .eps, .pdf, and .svg. A lot of software packages export to vector formats. One thing to be wary of is that being in this format does not necessarily mean the artwork is vector. Vector formats also support inclusion of raster graphics. One common example is scanning to PDF format. A scan to PDF will produce a raster stored in a PDF (vector) document.
1.1 What does a vector file look like?
The easiest vector format to make sense of (read) is .SVG format which stands for scalable vector graphics. SVG is an extensible mark-up language format (.xml), as is HTML.
Here is the SVG markup used to produce the image below:
<?xml version="1.0" standalone="no"?>
<!DOCTYPE svg PUBLIC "-//W3C//DTD SVG 1.1//EN" "http://www.w3.org/Graphics/SVG/1.1/DTD/svg11.dtd">
<svg width="100%" height="100%" version="1.1" xmlns="http://www.w3.org/2000/svg"><polygon points="220,100 300,210 170,250"
style="fill:#cccccc;
stroke:#000000;stroke-width:1"/>
</svg>

TRY THIS: Copy and paste this markup into a proper text editor (e.g. notepad++, textwrangler). Makes some modifications and save as “somefilename.svg” Open the svg to see what happened to it.
Raster graphics
Here are some commonly used raster graphics formats used in illustrations: .tiff, .gif, .png, .jpg. These formats differ in the type of information they can store and the method used to reduce the file size (compression).
What is stored in a raster file?
Each pixel in a typical image format stores information about the level of Red, Green and Blue or a single greyscale channel. The standard format for this is 24bit (3 bytes) which allows for 256 different levels for each of these colours with 0 representing none of that colour and 255 representing full colour. Using this format, it is possible to represent 256 x 256 x 256 = 16.7 million possible shades for each pixel. Sometimes the Hex shorthand is used to represent a colour: e.g. #1212ff. Hexadecimal uses the letters a-f to represent the numbers 10-16 (16*16=256).
Try this: Think about which colour each of these represents:
- R=20, g=20 b=20
- R=0, g=0, b=255
- R=255, g=255, b=255
Transparency (Alpha channel)
Another channel that may be stored in pixels is transparency. This is often called the alpha channel. Some raster formats (e.g. PNG-24bit and .tiff) support alpha the same as the other colours. E.g. 256 levels of alpha for each pixel. Other formats such as GIF support only 2 levels of alpha (on/off) for each pixel. Other formats don’t support alpha channel (e.g. JPEG)
Transparency can be used to create objects that appear to be shapes other than rectangles etc. as in the example below.
TRY THIS: Download the image above and view it in a vector graphics package with some different coloured backgrounds to observe the transparency.
File types and compression
If we need 3 bytes for each pixel and we have an image that is 3000 x 4000 (the dimensions of a typical photo captured on a camera) we would require 36,000,000 bytes in total! Most image formats support some kind of compression to reduce this size. There are two major types of compression: lossy and lossless. Compression is one of the major considerations when choosing which image format to use.