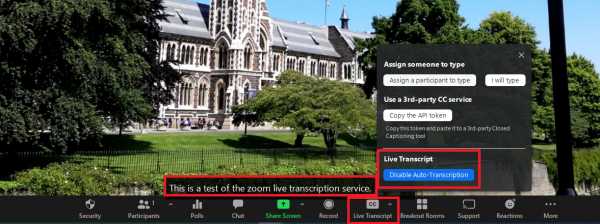
Live Transcription

How to enable live transcription in your meetings:
Please note: This is enabled by default on all Otago Zoom accounts, so steps 1-4 below can be skipped, however if it is not enabled on your account for some reason, please do the following:
- Sign into your Zoom account on the web.
- Go to Settings > Meeting > In Meeting (Advanced)
- Turn on Closed Caption
- Turn on Enable live transcription service to show transcript on the side panel in-meeting.
Turning on Live Transcript during a meeting
- Make sure you have joined your meeting as the Host by being signed into your Zoom account before starting the meeting.
- Join your meeting as per normal.
- Click “Closed caption” or “Live Transcript” from the menu bar at the bottom of the Zoom window.
- Select “Enable Auto-Transcription”
Zoom will now begin live captioning your meeting. Speech will be automatically detected and displayed at the bottom of the screen.
Please note: Although generally it is reasonably accurate, it is unlikely to be 100% correct and will contain errors therefore can not be relied upon for any situations where exact translation is critical. According to Zoom’s support page, a live transcript’s accuracy can be impacted by:
- Background noise
- Volume and clarity of the speaker’s voice
- Speaker’s proficiency with the English language
- Lexicons and dialects specific to a geography or community
If Live Transcription is not sufficiently accurate for your needs, then Zoom recommends typing manual captions.

