Preparing illustrations for use in theses, reports and publications
Considerations
What software are you making your thesis in? The two main ones are ms word and latex. Please note that due to the variation in versions of ms-word on pc and mac, it is difficult to write consistent instructions for it.
Create a figure template
Figure Width: make your figures so that they are always the width of the page minus the margins (see figure below). For publications you will have a template for one or two columns.
Figure Length:Make your figure length to suit the figure up to a maximum that leaves room for the caption to appear on the same page (see figure below).

Figure template guide.
Why not just scale each figure as necessary to fit in the word doc or LaTeX?
There are various reasons why using a template is the best approach:
- Image sizes won’t get bloated. You can set resolution of output (e.g. 300ppi) and know that the image will be 300ppi.
- Font size, stroke width etc. will be consistent
- Easier to make figures.
File formats
MS-word
For ms-word use EMF format to get vector graphics. Or use PNG/JPEG depending on whether the format is graphics like or photo like (refer to the poster in the graphics lab for this).
LaTeX
Best to just use PDF format. Occasionally there are issues with transparency, gradients and nested hidden objects.
Journals
Journals are sometimes restrictive in what format they accept. They usually focus on people submitting a particular file format at a particular resolution rather than assessing the quality (e.g. optical resolution of rasters) or file size issues. Ideally you would just submit PDF for vector figures. Sometimes they won’t accept PDF but will accept EPS which is a similar format. For rasters they tend to prefer .tiff at 600ppi or 1200ppi, even though PNG is much better at lossless compression of some rasters.
Techniques using Adobe illustrator
Make sure you check the use artboards thing on export. Refer to this post on pdf linking embedding and saving in illustrator
You might also find the post on optimising pdfs in acrobat pro useful.
Adobe illustrator: Ai, pdf, linking, embedding and saving
This post is all about how to deal with linking, embedding and saving in adobe illustrator. If you are in the geology department I have put a poster up in the graphics lab with this information on it.
How to save to .ai
Go to File>Save As and choose .ai from the drop down list.

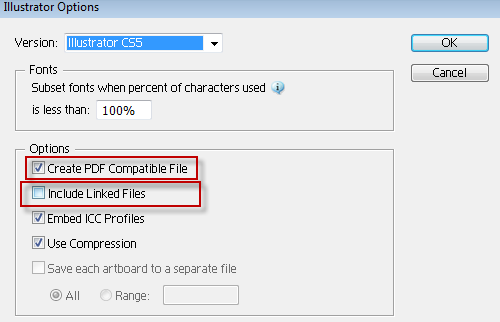
From here you can choose which illustrator version you want to save to, whether the file should be pdf compatible and whether to embed images (include linked files).
How to save as .pdf
Go to File>Save As and choose .pdf from the drop down list
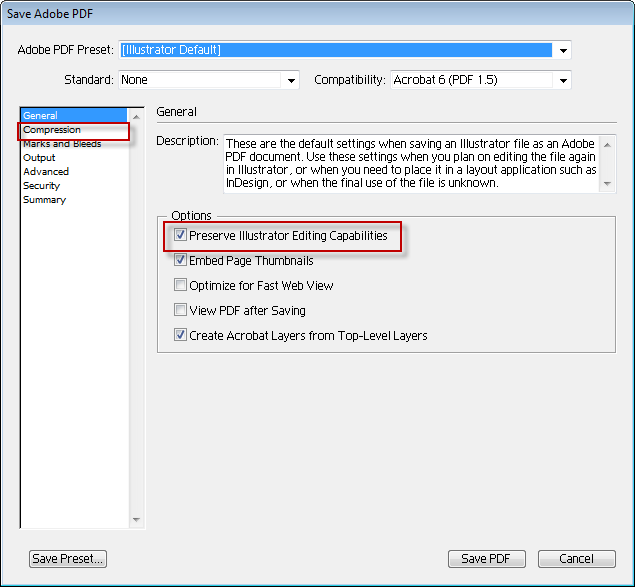
From here you can choose to preserve illustrator editing capabilities (make it .ai compatible). There are also various options for down-sampling and compressing images (compression).
Embedding images
There are a few options for embedding images in adobe illustrator. By default if you drag and drop your images in, they will be linked rather than embedded.
If you add your images via File>Place you can choose to link or embed them then.
Once an image is added you can embed it by selecting the image and then clicking embed in the toolbar at the top of the window.
![]()
The other option is to embed them when you save the ai document by checking the box for include linked files.
Image storage and file size

Recommendations
Adobe have blurred the lines between their pdf format and their ai format. I would argue that this is not a good thing. Ai is a good working format for your figures and pdf is a good export format. My preferred approach is to use ai for working. I also use linked files (except for some small images). Using linked files improves the saving time and performance working with ai. Usually I will put a copy of the images in a folder with the ai file to keep them together. Another benefit to this approach is that you can edit the image and have it update.
For export I use .pdf with illustrator compatibility unchecked. At export time you should also downsample and compress your rasters to reduce the pdf file size (acrobat can also do this via optimise pdf).
Note: If you have embedded illustrator compatible images in your pdf you cannot get rid of these using acrobat you must open the pdf in illustrator and save without ai compatibility.
Aligning multiple images in photoshop
We want images stacked
Sometimes we capture images of the same area (e.g. a particular part of a thin section) using different conditions (reflected light, PPL, XPL, Cathodoluminescence) . We may then want to stack the images together so that we can see how each different mineral, for instance, appears under the different conditions.
THE PROBLEM
We can align objects manually because we see recognisable features in each image. It can be a little tedious and difficult trying to add, manually align, resize and rotate the images in software like: Adobe Illustrator, photoshop, the gimp, image j or other software.
There is a semi-automated way to speed up this process in photoshop. I’m not sure of the exact conditions under which this will actually work. But it’s fairly easy to try and could save you a load of time.
How to do it
The first thing we need to do is to load all the images as layers in a photoshop document.
- Open photoshop
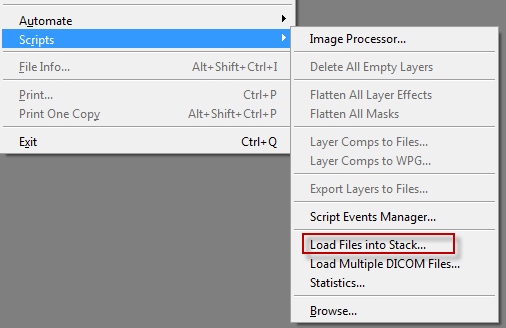
- Go to file>Scripts>Load files into Stack
- Navigate to the folder with your images in it and load these.
You should now see all your images as layers in photoshop with names corresponding to file names (handy eh?).
- Select all the layers by clicking on the top layer and then shift clicking on the bottom layer. They should all have a blue background in the layers panel indicating they are all selected.
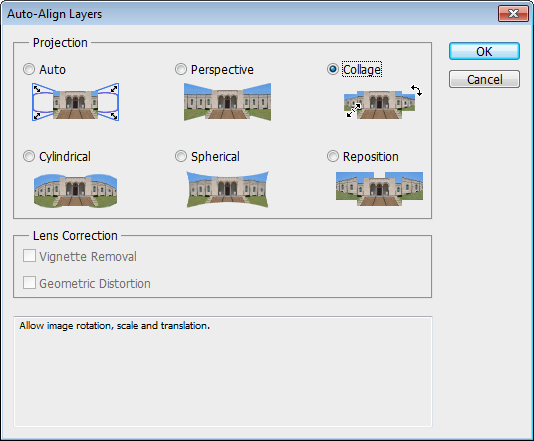
- Now go to edit>auto-align layers
- I recommend trying collage first which will not distort the image.
Thanks to Steve Kidder for working this out with me.
Margins for printing
Document types and margins
Typically for text documents such as articles, or reports there will be more than 3mm of white margins all around the documents so there is little need for us to concern ourselves with printer margins. It is only when we create posters, fliers and booklets that we need to consider printing margins.

Image showing margins for posters vs word documents. On the left is a ms-word doc with plenty of margin. On the right is a poster with no margin. Printing the poster on the right without scaling first will cause 3mm of clipping of the image all around. The text will be too close to the edges and there may be problems with the image in the top left
Margins and professional printing
If we are going to a professional printer then we can create documents that go right up to the edges and they will be able to print these. Sometimes bleed will need to be added (where extra colour is printed around the edges of a document) that is later trimmed off by the printer. The use of bleed ensures that the colour goes right to the edges of printed documents.
Margins for consumer printers that use sheets
Most consumer printers will not print right up to the edges of paper and commonly require around 3mm of margins all around the document. This doesn’t mean that it is necessary to leave 3mm of edges white, if the document has colour right up to the edges then the last 3mm of colour will simply not be printed.
It should be noted that we do not want text to be right up against the margin even if it is not cut-off. We usually want at least a cm between the text and the edge of a page.
Ideally we could have considered the margins before we started making the document. If we have not there are a couple of options available to us.
- We could modify the document so that there is at least 3mm of margin (or content that will not be printed)
- We can simply scale the document when we print it
If we are using option 1 above then the exact approach will depend on the software used to edit the document. If we are using option 2 then the approach will depend on the software used to print the images.
Printing and scaling
Printing can be kind of confusing because of the variation and duplication of options between the software used to print, the printer drivers and potentially the printer itself.
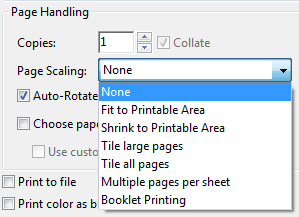
Menu for setting page scaling in adobe acrobat
There is usually an option in the software used to print that allows you to scale the page to fit the printable area (paper – printer margins). If you are printing to A4 and your printer needs 3mm of margin then the printable area will be 297mm-3mm= 294mm by 210-3mm=207mm, which equates to scaling by 97%.
Margins for large format printing on the geology plotter
For a breakdown on printing on the geology plotter (large format printer for posters maps etc.) please look at this poster: printing_on_the_plotter
TIP: A good trick with printing is to print a document to a pdf first to check if there are any issues with printing. Be aware that saving to a pdf in word reduces qualtiy of graphics, it is best to print to a pdf. Most professional printers prefer printing from pdf format (including otago uniprint) for text documents (e.g. theses).
Keeping a symbols document
Why and how?
Sometimes we use the same symbols over and over in different documents. It might be easiest with some of these symbols to store them in a ‘symbols’ document. You should use the native format for whatever software you are using, i.e. if using illustrator use an .ai file. You could store this symbols document on the desktop.
Why use this approach?
Most software has more sophisticated ways to store symbols, the downside to these are that they are a little complicated. This approach is super simple.

Some symbols that I commonly use, and copy to new documents.
