
This page covers reducing the file size of reports, theses and other written documents (compressing). Figures/images are the main contributor to large file sizes for documents. I show you how to deal with figures/images as you make them. I also show you how to compress the images in the document when you have finished writing.
Dealing with images as you go
It is a good idea to get into the habit of preparing your figures so they are the right dimensions, resolution, format, and file size as you go. I have instructions on my site that cover preparing illustrations for size and format.
Fixing up existing images
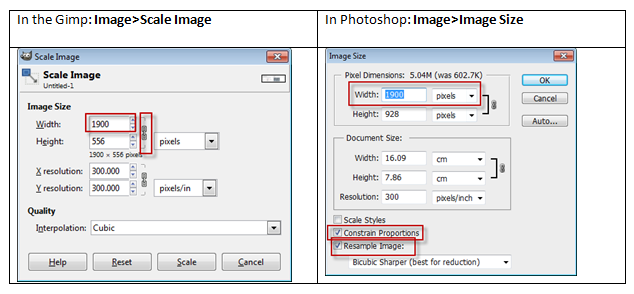
You may already have a bunch of large figures in JPEG, PNG or TIFF format. You can reduce their pixel dimensions using a raster editor such as the GIMP or photoshop. We want images that are 160mm wide in a word doc. At 300ppi these images should be 1900 pixels ((160/25.4)*300 ~1900) across. Open up each image in your raster editor (GIMP or photoshop), change the image size to 1900 pixels across and then save it. Make sure you maintain the aspect ratio.
EMF, JPEG or PNG?
If you want to get vector graphics into ms-word the best option is to use EMF file format. Generally, it is easier to use raster formats like JPEG or PNG in MS word. Choosing the correct format will give you the best results for the smallest file size.

Compressing the images in a document when you’ve finished writing
Here are instructions for compressing the images in a document, for various versions of ms word and acrobat pro. If you require specific instructions for software not listed below (i.e. older versions) then please contact me (luke.easterbrook@otago.ac.nz).
Please do check your pdf for consistency to the original document before submitting it!
MS word on PC (2010, 2013 and probably other recent versions)
File>Save As (type=PDF)
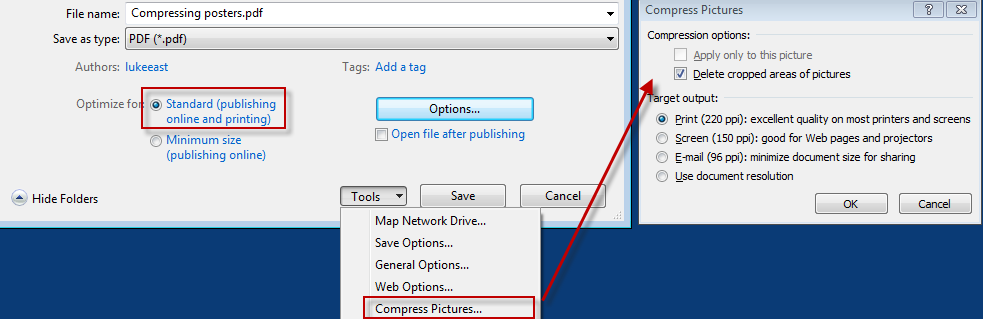
I recommend “220ppi” or “Use document resolution” for a print version. For an electronic version, you can try compressing it to 150ppi or 96ppi and then see if you are happy with the resulting pdf and file size.
MS Word on Mac (2011)
In MS Word on mac there is no option to downsample on export. You will have to compress the images and then export as pdf.
- First save a copy of the word document. Call it something like “doc_name”+ “_compressed”
- Click on any image to bring up the Format Picture menu in the ribbon.

- Select Format Picture
- Click on Compress
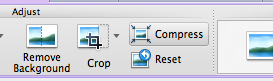
- Choose the Picture Quality. I recommend “220ppi” or “Use document resolution” for a print version. For an electronic version, you can try compressing it to 150ppi or 96ppi and then see if you are happy with the resulting pdf and file size.
- To save as pdf choose PDF from the save menu
Acrobat pro
In acrobat pro, you can compress PDFs. I have instructions on another page:
