
Questions? Comments?
The new Otago Capture system will bring several key new features and improvements. Over the next few weeks, we’re going to describe some of the most important of these changes, stating with the new Q&A tools.
Otago Capture now provides the ability for students to ask questions electronically. If the lecture is being live-streamed, the questions can be asked during the class, and the lecturer (provided she is logged in to Otago Capture) can view this feedback in real time. The screenshot below shows the view of Q&A within a particular lecture.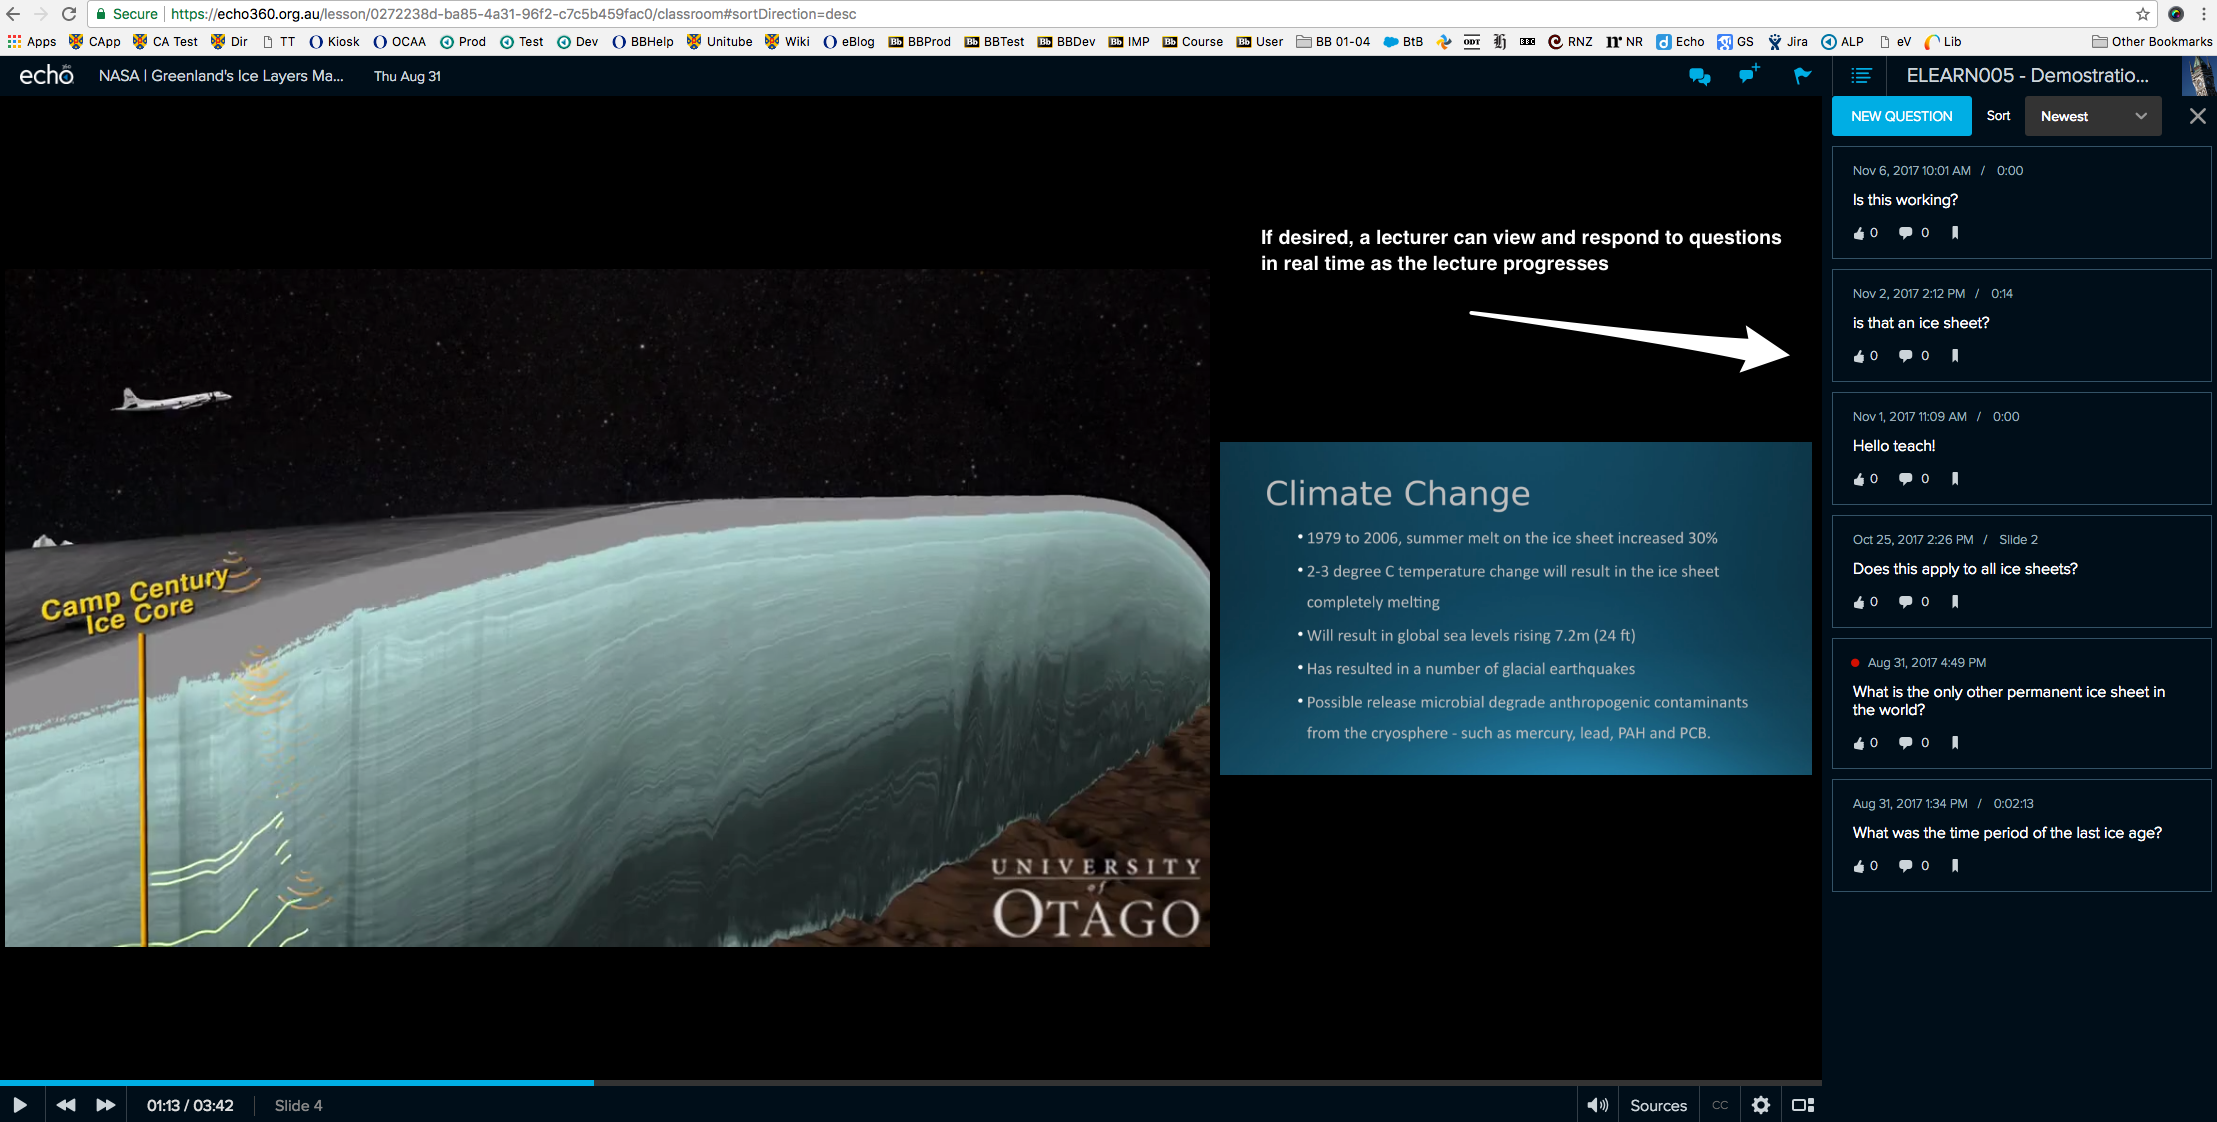
If, on the other hand, a students are watching a lecture recording later, they can post questions that can be addressed by the lecturer the next time she logs in. The next screenshot shows the Q&A tab from the main page of Otago Capture – where course users can see all questions and answers for all lectures.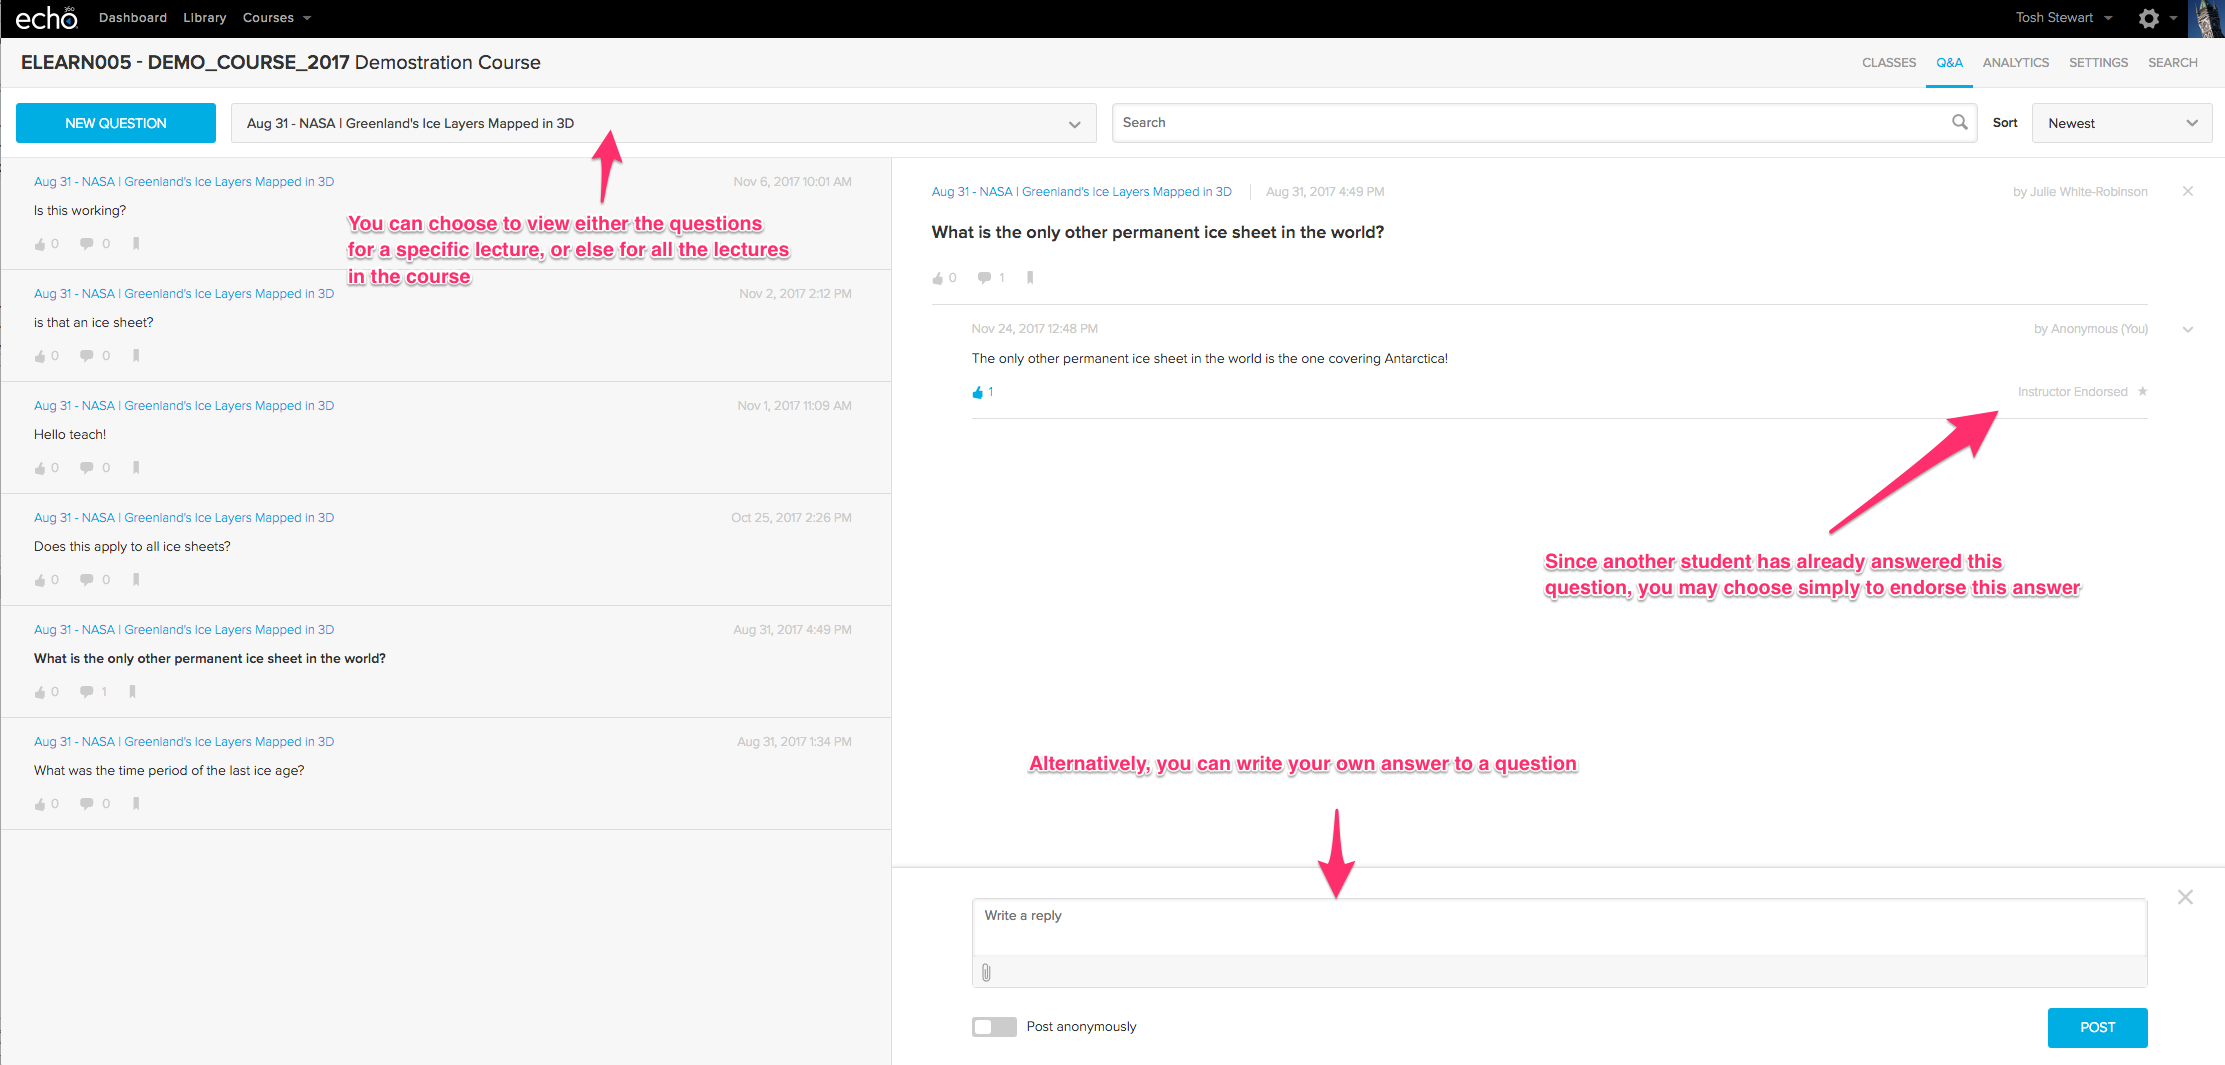
Questions are visible to all course users, and anyone is able to join in a discussion that follows from a question. It is entirely possible that another student in the course may adequately answer the first student’s question – in this case, the lecturer has the ability to ‘tag’ the satisfactory answer with an ‘Instructor endorsed’ label.
When a student asks a question, she can select to label the question as pertaining to a particular moment of class content, so that the lecturer immediately sees the context for the question. A student can also choose to ask a question anonymously – though it is important to note that this anonymity only extends to other student users of the course: a lecturer can always see the identity of the question-asker .
Some lecturers may prefer that students are not able to ask questions in this manner. If so, the whole Q&A tool can be turned off for a course. If Q&A is turned off part way through a course, then any questions and answers that have been posted, will disappear. However, this content is not permanently lost, and will reappear if the Q&A tool is turned back on. This means that it is possible to allow question asking only during (or only after) a lecture, with the tool being turned off for the remainder of the time.
Bulk downloading of old recordings from Otago Capture
If you own an Otago Capture section from 2015 or 2016 you should have recently received an email alerting you to the fact that your recordings for those years will soon be deleted, as part of our transition to the new cloud-based version of Otago Capture.
You may wish to download those recordings. There is quite a straightforward process for downloading these recordings, which is explained in our help site.
However, we’ve had a few enquiries from staff who have a large number of recordings stored in Capture. Downloading the recordings one by one is fiddly and time-consuming when there is a large set to get through.
My colleague Luke Erickson has developed a workaround that should lead to significant same-savings in such cases. In a nutshell, the idea is to enable an RSS feed with iTunes metadata for your section, and then use iTunes to download all the recordings in that section. Because it includes metadata, the files should be correctly named and grouped in a helpful folder in your iTunes library.
The first step requires RSS to be enabled for your sections. As a section owner, this is not something you can action, but if you contact Service Desk, they will be able to change the settings for your section. Ask them also to send you a URL for the RSS feed, specifically for the ‘vodcast’ option of your recordings (this means that the downloaded recordings will also include video if present).
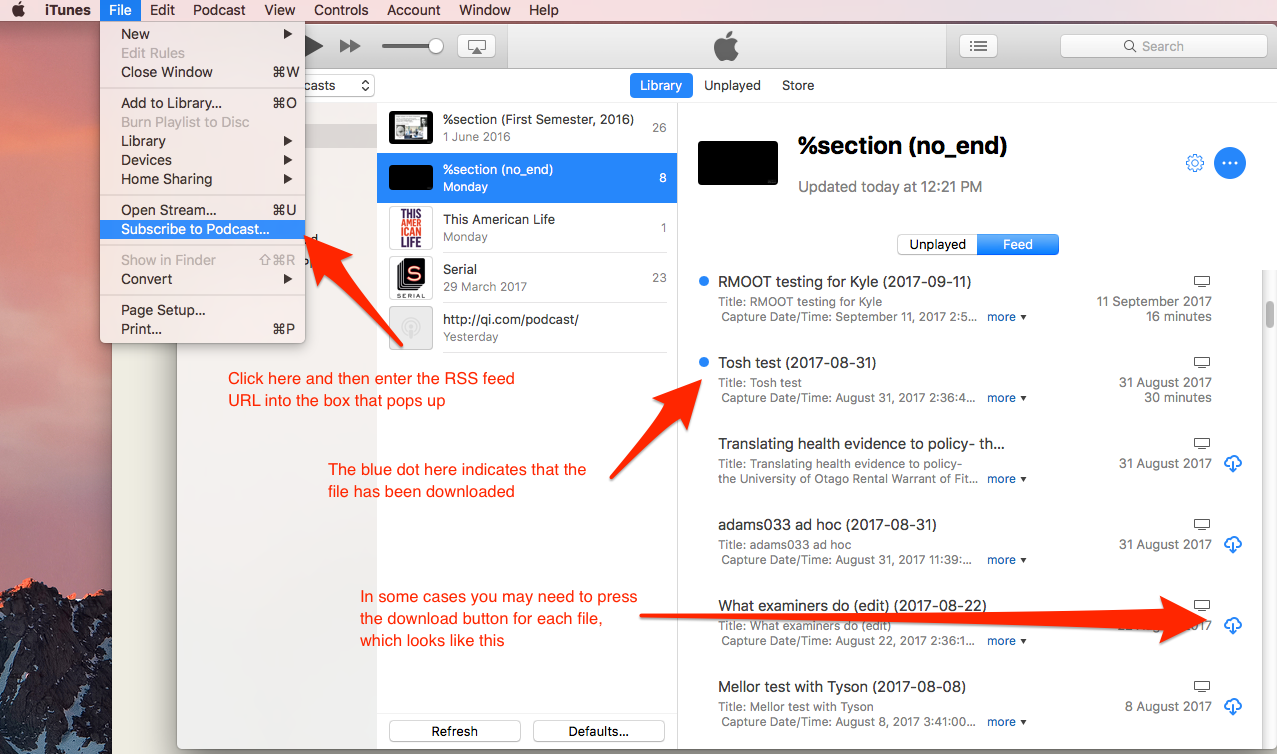
Now open iTunes on your computer. Select ‘Subscribe to podcast’, and paste the RSS feed into the resulting box. This should then download the stream of files from your section (you may need to press a download button for each file if they don’t download automatically). The screenshot below includes some more detail on this.
Once the files have downloaded, you can right click on any of them within iTunes, and select ‘Show in Finder’. This will show you where your recordings are stored on your computer, and you can copy or back them up accordingly.
These instructions are written for a recent version of iTunes (12.7) for Mac OS X. Service Desk may be able to assist if you need help in tailoring the steps for iTunes on a PC, or for an older version of the software.
Delegated Grading and Tutorial Groups
This week I’ve been getting to grips with Blackboard’s Delegated Grading tools, with a particular object in mind.
For many larger papers at Otago, the traditional way to handle assignment marking is that the set is divided amongst a team of tutors, each of whom marks her own students’ submissions. The tutors are also usually given access only to the submissions they are required to grade. Then the lecturer has final sign-off on the complete set from all tutors before the grades and comments are released back to students.
A combination of the Delegated Grading and Groups functions in Blackboard can replicate this traditional picture quite efficiently, although the initial set up requires a few fairly straightforward steps. In this blog post, I’m going to go through those steps.
- First, set up groups in the Blackboard paper. Initially these groups can just be empty placeholders. These Blackboard groups should be named according to a predictable convention, and should have a one-to-one correspondence with the tutorial groups of the paper – so it is fine to call them ‘Tutorial group 1’ or ‘Jane Blogg’s students’ or similar. In the group settings, it is important that the groups be made ‘visible to students’. Some more detailed instructions on creating groups can be found here.
- Now we want to populate those groups. The most efficient way to do this requires an excel sheet that contains the student usernames for the paper, correlated against the tutorial group each student is in. In other words, you need a sheet that has at least two columns: one with username, and one with tutorial group. If you don’t already have a table such as this, one can be generated using Business Objects. This information can be used to copy into a template excel sheet, exported from Blackboard’s groups menu, and then reuploaded. More detailed instructions for this step can be found here.
- In order to have each tutor given access to only her own student’s submissions, her role in the course should be set to ‘Grader’. If necessary, the roles of any of the teaching staff can be adjusted using the Blackboard Staff Administration Application. Some more instructions on this step can be found here.
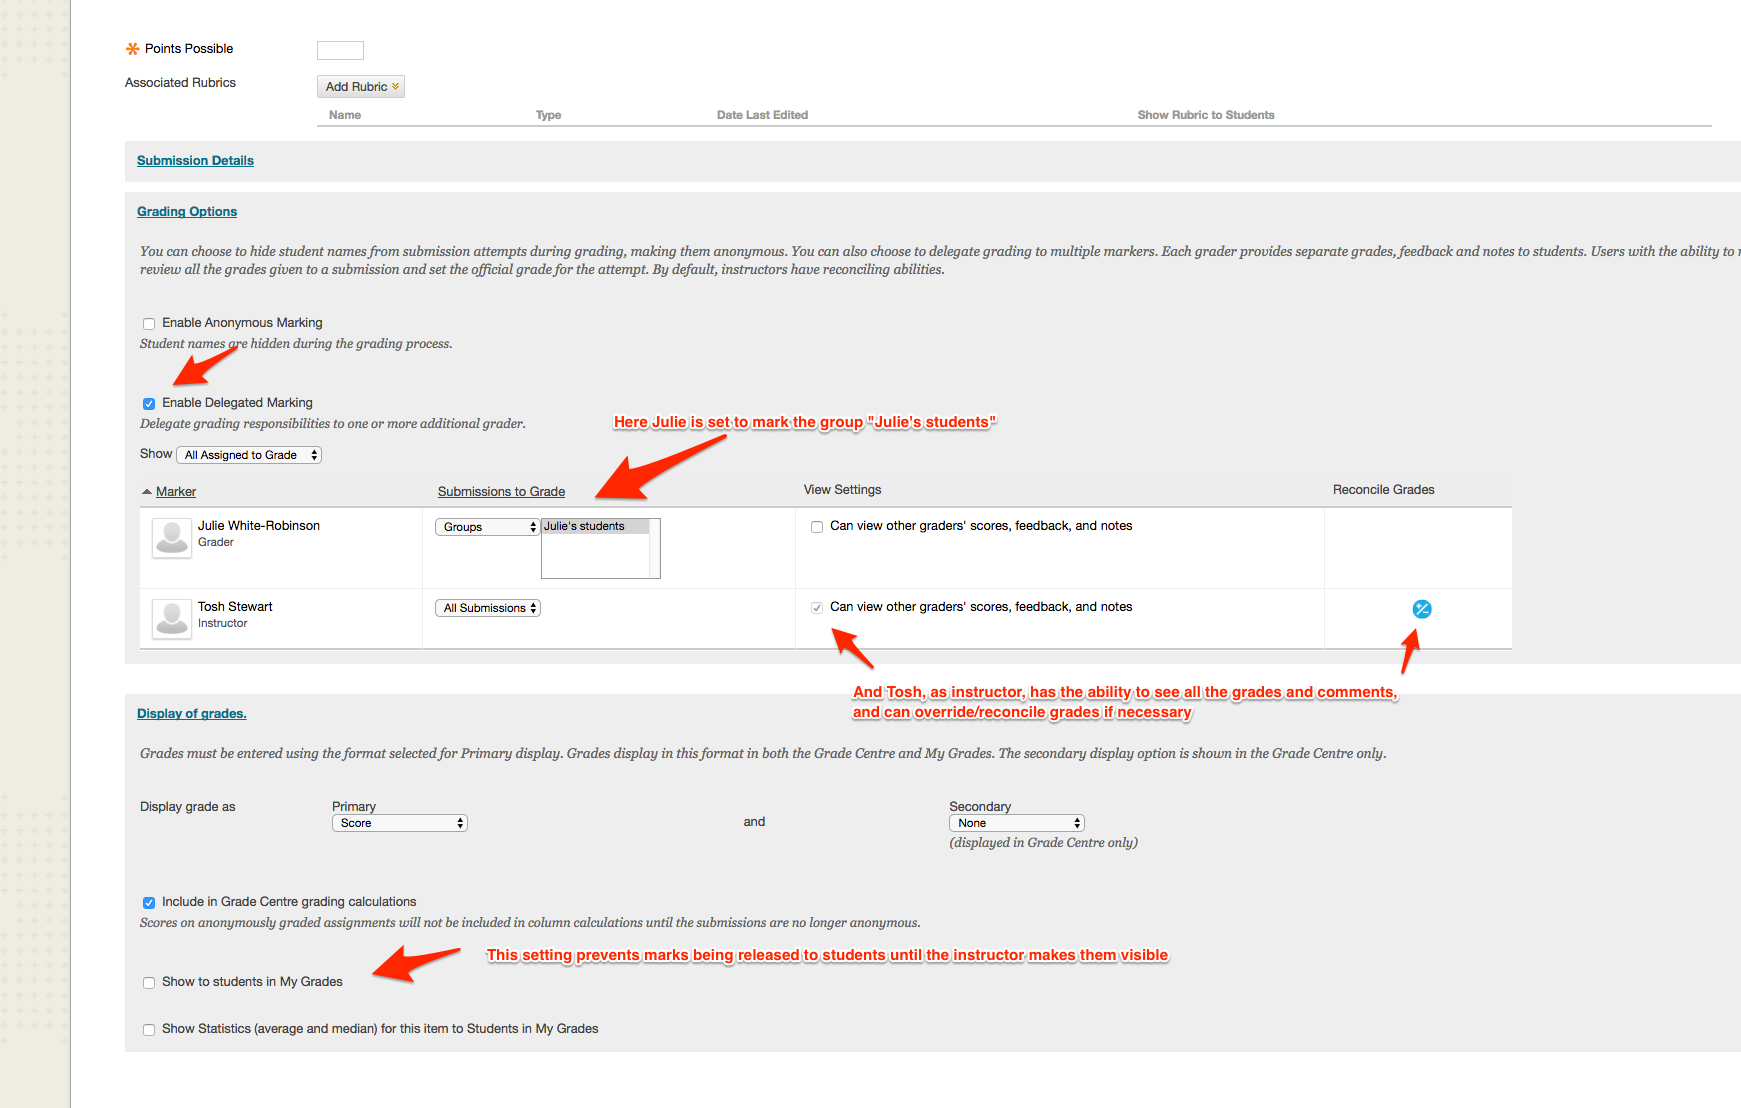
- With the groups set up and the tutors’ roles assigned, we now just need to set up the assignment with Delegated Grading. In the assignment settings page, open out the grading options menu, and select the delegated grading check box. Then assign each tutor to have access to her own groups. As you can see from the screenshot below, Julie is assigned to mark the group “Julie’s Students”, but not to see any other markers’ work. And only Tosh has the ability to reconcile grades. I also suggest hiding the grades from students until you are ready to release them.
Executing these steps makes it straightforward for a grader to mark the submissions from a given tutorial group. It also has the benefit of increasing the privacy of student submissions – now each student’s submission is able to be viewed only by those specific people who are required to see it for marking purposes.
eLearning will be happy to help if you want support in following these steps – please contact the ITS Service Desk for more information.
