Reducing the file size of reports, theses and other written documents (compressing)
This page covers reducing the file size of reports, theses and other written documents (compressing). Figures/images are the main contributor to large file sizes for documents. I show you how to deal with figures/images as you make them. I also show you how to compress the images in the document when you have finished writing. (more…)
Illustration/Graphics resources incl. USGS patterns pack
I’ve just put a new section on this website with Illustration/Graphics resources. In this section is a page with a USGS AI pack instructions and a download link. The pack contains patterns for geological mapping such as schist, limestone and other things. The instructions make it really easy to use.
I will be adding a USGS Inkscape pack soon with instructions. I will also be adding more Illustration/Graphics resources as time permits.
Focus stacking images
This article has been specifically written for using the macro-photography setup in the Graphics Lab in the geology department and Adobe Photoshop CS5. Concepts are applicable to other equipment and versions of Photoshop.
UPDATE:
I have made a new post with instructions using Zerene stacker to stack the images rather than photoshop because it is faster, easier and produces better results in all cases that I have seen. For example Zerene Stacker took 72s to stack 11 images and photoshop took 125s, the difference in stacking speed is even more pronounced when more images are used.
Preparing illustrations for use in theses, reports and publications
Considerations
What software are you making your thesis in? The two main ones are ms word and latex. Please note that due to the variation in versions of ms-word on pc and mac, it is difficult to write consistent instructions for it.
Create a figure template
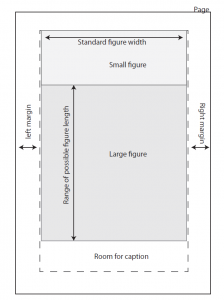
Figure Width: make your figures so that they are always the width of the page minus the margins (see figure below). For publications you will have a template for one or two columns.
Figure Length:Make your figure length to suit the figure up to a maximum that leaves room for the caption to appear on the same page (see figure below).

Why not just scale each figure as necessary to fit in the word doc or LaTeX?
There are various reasons why using a template is the best approach:
- Image sizes won’t get bloated. You can set resolution of output (e.g. 300ppi) and know that the image will be 300ppi.
- Font size, stroke width etc. will be consistent
- Easier to make figures.
File formats
MS-word
For ms-word use EMF format to get vector graphics. Or use PNG/JPEG depending on whether the format is graphics like or photo like (refer to the poster in the graphics lab for this).
LaTeX
Best to just use PDF format. Occasionally there are issues with transparency, gradients and nested hidden objects.
Journals
Journals are sometimes restrictive in what format they accept. They usually focus on people submitting a particular file format at a particular resolution rather than assessing the quality (e.g. optical resolution of rasters) or file size issues. Ideally you would just submit PDF for vector figures. Sometimes they won’t accept PDF but will accept EPS which is a similar format. For rasters they tend to prefer .tiff at 600ppi or 1200ppi, even though PNG is much better at lossless compression of some rasters.
Techniques using Adobe illustrator
Make sure you check the use artboards thing on export. Refer to this post on pdf linking embedding and saving in illustrator
You might also find the post on optimising pdfs in acrobat pro useful.
Adobe illustrator: Ai, pdf, linking, embedding and saving
This post is all about how to deal with linking, embedding and saving in adobe illustrator. If you are in the geology department I have put a poster up in the graphics lab with this information on it.
How to save to .ai
Go to File>Save As and choose .ai from the drop down list.
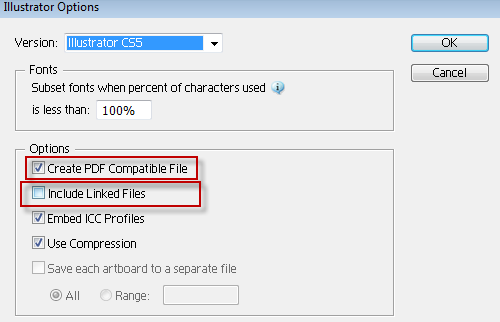
From here you can choose which illustrator version you want to save to, whether the file should be pdf compatible and whether to embed images (include linked files).
How to save as .pdf
Go to File>Save As and choose .pdf from the drop down list
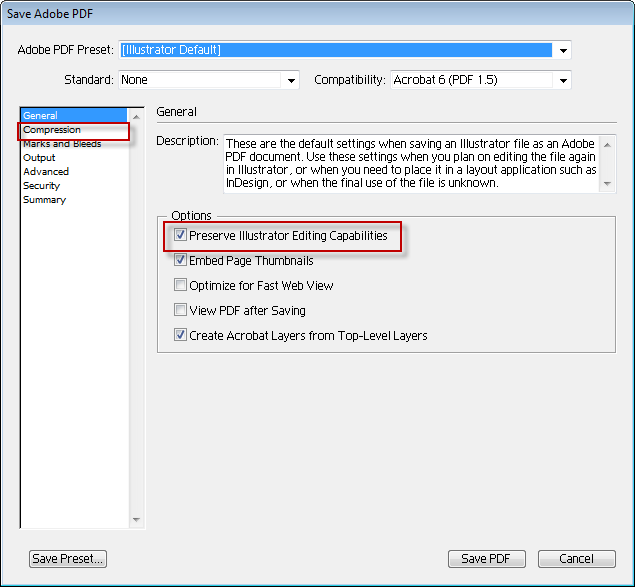
From here you can choose to preserve illustrator editing capabilities (make it .ai compatible). There are also various options for down-sampling and compressing images (compression).
Embedding images
There are a few options for embedding images in adobe illustrator. By default if you drag and drop your images in, they will be linked rather than embedded.
If you add your images via File>Place you can choose to link or embed them then.
Once an image is added you can embed it by selecting the image and then clicking embed in the toolbar at the top of the window.
The other option is to embed them when you save the ai document by checking the box for include linked files.
Image storage and file size
Recommendations
Adobe have blurred the lines between their pdf format and their ai format. I would argue that this is not a good thing. Ai is a good working format for your figures and pdf is a good export format. My preferred approach is to use ai for working. I also use linked files (except for some small images). Using linked files improves the saving time and performance working with ai. Usually I will put a copy of the images in a folder with the ai file to keep them together. Another benefit to this approach is that you can edit the image and have it update.
For export I use .pdf with illustrator compatibility unchecked. At export time you should also downsample and compress your rasters to reduce the pdf file size (acrobat can also do this via optimise pdf).
Note: If you have embedded illustrator compatible images in your pdf you cannot get rid of these using acrobat you must open the pdf in illustrator and save without ai compatibility.


