Optimising PDFs in acrobat pro (including downsampling and compressing rasters)
Sometimes we are required to reduce the file size of a pdf so that it can be uploaded, emailed etc. When we are printing something we always want to use an uncompressed version though.
Some concepts
There are a couple of key concepts that are useful to understand when reducing the file size of a pdf. Usually vector text graphics etc. take up a small proportion of the pdf file size and the thing that makes pdfs large are embedded rasters (aka bitmaps, images) such as photos. To make these rasters smaller we can do two things to them.
1 Downsampling
This is the process of reducing the number of pixels in an image. Typically downsampling will be achieved by choosing a lower pixel density (PPI) such as 150ppi rather than 300ppi. This will result in a squared reduction in file size. For example if you downsample from 300 to 100ppi the new file will be ¼ the size of the original. You might choose to downsample an image if you don’t expect someone to view it at a high pixel density (i.e. for images that will only be viewed on screen).
2 Raster compression
This is the process of storing the information about an image more efficiently. Compression falls into two categories: lossy and lossless and there are a variety of file types that utilize different compression algorithms. Jpeg compression is lossy and stores information about how the colours change from one corner of an 8×8 pixel square to the other corner (if you look closely at highly compressed JPEGs you can see this effect . Sometimes compression is used generally to refer to any kind of activity that will reduce the file size, I will use raster compression to explicitly refer to the compression to a raster image not including downsampling.
More concepts
For a bit of background check out the blog post I did about pixel count resolution etc.
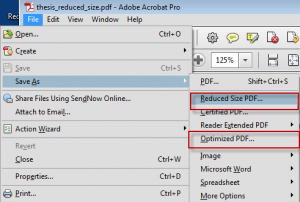
The quick and dirty method: saving as reduced size pdf from acrobat pro
This is a bit of a mystery approach. I’ve looked into it and I cannot figure out what this actually does to the rasters. Sometimes this works ok. This is the quick and dirty approach.
The better approach: save as optimising pdf
Saving as optimised pdf gives you a lot more options including the ability to see what is taking up space in your pdf (Click on Save as> Optimized PDF>Audit space usage).
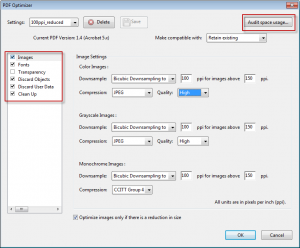
Clicking on audit space usage will bring up a box listing the size and percentage for each element in your pdf. In the example below there are three main contributors to the large file size:
- Images
- X-object Forms: the vector graphics in the document
- Piece information: In the case of this document this turns out to be information created by the program that made the pdf (LaTeX) and we don’t actually need it.
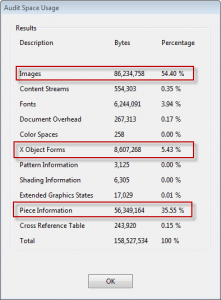
We can do stuff to make 1 and 3 Smaller but there’s not much we can do about 2 (in some rare cases rasterising the really complex vector graphics may help).
Other optimising things
Before we start downsampling and compressing the images it’s useful to look at what can be done to the rest of the pdf. I found this useful information out from http://chris-hummersone.blogspot.co.nz/2011/01/how-to-reduce-size-of-your-document.html . Chris’s post deals specifically with pdfs created from LaTex but the principles should be transferable to any pdf.
Below are the settings he recommends for each tab (for more detail read his post).
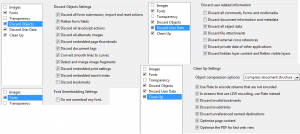
I recommend saving these settings so you can use them again. In the example above where piece information contributed ~50MB the file size was reduce by approximately 50MB.
Image downsampling and raster compression
The amount of downsampling and raster compression that you choose to use is going to depend on the purpose for the document. The lower limit I would go to is bicubic downsampling to 100ppi for all image types and JPEG at high quality. This should produce a much smaller pdf for viewing on a computer (e.g. 20MB vs. 150MB). You may want to save various configurations for downsampling and compressing that are fit for different purposes.
Do not do any compression to the version you want to print. Print is much higher resolution than on screen and any compression is much more noticeable.
Some notes on saving PDFs with illustrator compatibility and/or embedded images.
I’m not entirely sure if optimising a pdf will get rid of extra images that are stored when pdfs are saved from illustrator with ai compatibility checked and embedded images. See my previous post for information about best saving practices from AI.
The Home folder in ArcGIS
The problem
Isn’t it annoying having to constantly navigate to this that and the next place to save, export or open files? This is especially an issue when dealing with ArcGIS where you have connections between data and maps to maintain.
The solution for ArcGIS 10.0: the Home folder
The home folder is the folder where your map is saved. So if you locate your maps as high up your folder hierarchy as possible you can navigate to all your data from there.
Home folder in ArcCatalog
The Home folder in ArcCatalog appears at the top of the list. Sometimes you need to scroll up to see it.

Home folder in Save or export dialog
The Home folder also appears on the save or export dialog boxes. It’s pretty subtle though (I only just noticed it!).
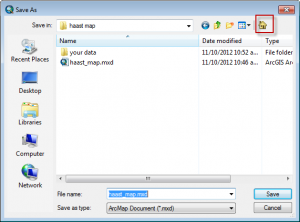
The home folder appears in a few other places where you open/save/export/import. Keep a look out for it to save time!
Coordinate systems in ArcGIS 10
One thing that has always frustrated me in ArcGIS is selecting coordinate systems. ArcGIS does feature a “favourites” options for coordinate systems but this only appears in a couple of dialog boxes.
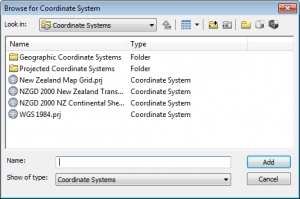
The solution: Just copy and paste the coordinate system files to the same folder as all your coordinate systems.
On my computer the path was C:\Program FIles (x86)\ArcGIS\Desktop10.0\Coordinate Systems.
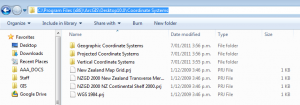
Now when I browse they appear right under coordinate systems.
Aligning multiple images in photoshop
We want images stacked
Sometimes we capture images of the same area (e.g. a particular part of a thin section) using different conditions (reflected light, PPL, XPL, Cathodoluminescence) . We may then want to stack the images together so that we can see how each different mineral, for instance, appears under the different conditions.
THE PROBLEM
We can align objects manually because we see recognisable features in each image. It can be a little tedious and difficult trying to add, manually align, resize and rotate the images in software like: Adobe Illustrator, photoshop, the gimp, image j or other software.
There is a semi-automated way to speed up this process in photoshop. I’m not sure of the exact conditions under which this will actually work. But it’s fairly easy to try and could save you a load of time.
How to do it
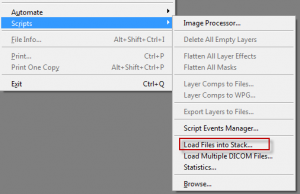
The first thing we need to do is to load all the images as layers in a photoshop document.
- Open photoshop
- Go to file>Scripts>Load files into Stack
- Navigate to the folder with your images in it and load these.
You should now see all your images as layers in photoshop with names corresponding to file names (handy eh?).
- Select all the layers by clicking on the top layer and then shift clicking on the bottom layer. They should all have a blue background in the layers panel indicating they are all selected.
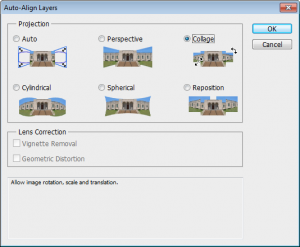
- Now go to edit>auto-align layers
- I recommend trying collage first which will not distort the image.
Thanks to Steve Kidder for working this out with me.
Margins for printing
Document types and margins
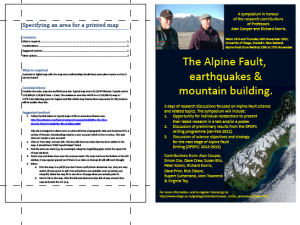
Typically for text documents such as articles, or reports there will be more than 3mm of white margins all around the documents so there is little need for us to concern ourselves with printer margins. It is only when we create posters, fliers and booklets that we need to consider printing margins.
Margins and professional printing
If we are going to a professional printer then we can create documents that go right up to the edges and they will be able to print these. Sometimes bleed will need to be added (where extra colour is printed around the edges of a document) that is later trimmed off by the printer. The use of bleed ensures that the colour goes right to the edges of printed documents.
Margins for consumer printers that use sheets
Most consumer printers will not print right up to the edges of paper and commonly require around 3mm of margins all around the document. This doesn’t mean that it is necessary to leave 3mm of edges white, if the document has colour right up to the edges then the last 3mm of colour will simply not be printed.
It should be noted that we do not want text to be right up against the margin even if it is not cut-off. We usually want at least a cm between the text and the edge of a page.
Ideally we could have considered the margins before we started making the document. If we have not there are a couple of options available to us.
- We could modify the document so that there is at least 3mm of margin (or content that will not be printed)
- We can simply scale the document when we print it
If we are using option 1 above then the exact approach will depend on the software used to edit the document. If we are using option 2 then the approach will depend on the software used to print the images.
Printing and scaling
Printing can be kind of confusing because of the variation and duplication of options between the software used to print, the printer drivers and potentially the printer itself.
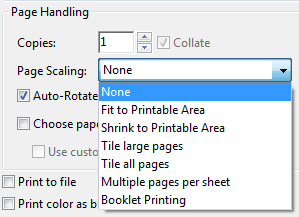
There is usually an option in the software used to print that allows you to scale the page to fit the printable area (paper – printer margins). If you are printing to A4 and your printer needs 3mm of margin then the printable area will be 297mm-3mm= 294mm by 210-3mm=207mm, which equates to scaling by 97%.
Margins for large format printing on the geology plotter
For a breakdown on printing on the geology plotter (large format printer for posters maps etc.) please look at this poster: printing_on_the_plotter
TIP: A good trick with printing is to print a document to a pdf first to check if there are any issues with printing. Be aware that saving to a pdf in word reduces qualtiy of graphics, it is best to print to a pdf. Most professional printers prefer printing from pdf format (including otago uniprint) for text documents (e.g. theses).

