How to compress powerpoint presentations
These instructions are applicable to Powerpoint 2011 on MacOS and Powerpoint 2013 on PC (and probably versions on either side of these).
The size of your Powerpoint presentation is mostly going to be based to the number of images you have in your presentation, image size (especially if you are using MacOS), and your default compression settings (only applicable if you are using a windows PC).
1.1 How to compress images in your powerpoint presentation (PC 2013)
When you are finished preparing your presentation I recommend first saving your working copy. Then save an export version that is compressed. This is so that you still have a version with high quality images to work on if need be.
- To compress your presentation go to File>Save As and choose Tools>Compress Pictures (next to Save)

- Then choose the compression level. Try 150ppi and then save. If it still isn’t small enough try 96ppi.

Note: If any of the options are greyed out it usually means you have already had that compression level applied by default (see note on checking default options below).
Note: “Delete cropped areas of pictures” will lock in any crops you have made.
If you’re interested in having a bit more control over image resolution check out the instructions below covering how to check/change the default compression in your power point presentation.
1.2 How to compress images in your powerpoint presentation (MacOS 2011)
By default on MacOS there is no compression applied and your document size will be greater than the size of all the images you add to it.
TIP: When you are finished preparing your presentation I recommend first saving your working copy. Then save an export version that is compressed. This is so that you still have a version with high quality images to work on if need be.
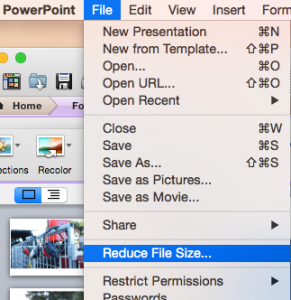
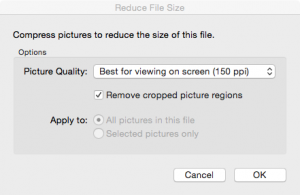
- To compress your presentation go to File>Reduce File Size

- Then choose the compression level. Try 150ppi and then save. If it still isn’t small enough try 96ppi.

Note: “Delete cropped areas of pictures” will lock in any crops you have made.
1.3 How to check/change the default compression in your power point presentation (PC 2013)
In recent versions of ms office most systems are set to compress by default as soon as you fits save a document. So it makes sense to check out what your default options are in PowerPoint. You can find out what your defaults are by:
- Go to File>options.
- Click on Advanced on the left hand side
- Look at Image Size and Quality for details

- From here you can change the amount of downsampling (compression) applied.
- Most systems seem to have 220ppi set as the default. I would leave this set at 220ppi (or even check “Do not compress images in this file”) so that images aren’t compressed very much for your working copy.
NOTE: 220ppi applies to the smallest size the image has been when the document is saved and closed. So if you decide to enlarge an image you have previously shrunk (with a save and close in between) it will have 220ppi resolution at the smaller size.
1.4 How to check/change the default compression in your powerpoint presentation (MacOS 2011)
There is no way to set default compression on powerpoint on MacOS (as far as I can tell), you need to do it manually via File>Reduce file size.
1.5 Problem solving powerpoint compression (for .docx format: PC and MacOS)
If you have any problems with PowerPoint presentations not compressing properly it might be because of one or more bad images. There is a little trick you can do to check the size of individual media files in your presentation. This works because .pptx format is actually a zipped folder format (as are all office formats that end with x).
- Make a copy of your presentation.
- Change the extension from pptx to docx
- Extract the .zip folder
- Go to Word>Media to see the media files.
If you find one image that is problematic you can swap it out by right clicking and choose change picture in powerpoint.

