Posted on by Luke
These are instructions for handling images in MS word 2011 on MacOS, including instructions on outputting final PDF. These instructions probably also apply to versions form 2010-2014.
If you are using a PC look at this post:
Introduction
It is typical to have images embedded in MS word documents (linking images is possible, but problematic). This document describes how ms word handles images and which methods/settings should be used to get the best results.
Image file formats
The best thing you can do for your images is make sure you are exporting your images at a reasonable pixel count (resolution >= 300ppi and image size matches size on page) See Preparing illustrations for use in theses, reports and publications.. Another thing to make sure is that you are using the correct image file formats. If you aren’t familiar with file formats and options for saving the safest formats to use are TIFF for photos and PNG for graphics. JPEG uses lossy compression and if you are not careful about applying settings the quality of the JPEG images in a final document can be poor.
Handling images in MS word MacOS (2011)
Importing images into MS word
Place images via Insert>Photo>Picture from file
You can also drag and drop images in, but this will convert TIFFs to PNGs.
Compressing large files
It is preferable if you put your images in at the correct size and resolution as you go. But if you are having trouble with ms word file sizes on macos you can compress the images.
- Go to file>reduce file size.
- Choose 220ppi
This is a one off operation and will need to be re-applied as you go. This will sometimes not affect TIFFs. It will apply a JPEG compression level of ~9 (High Quality).
Save as PDF or print to PDF
As far as I can tell regardless of whether you save from PDF or print to PDF you will get the same excellent results on MacOS.
To save:
- Go to Save as and choose PDF as the file type.
- Click on print icon or File>Print.
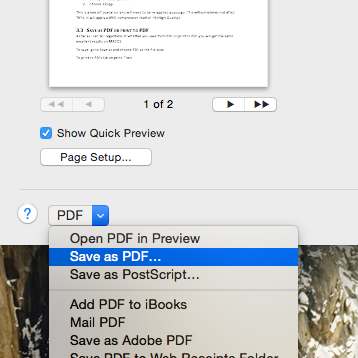
To print to PDF
Click on PDF drop down in the bottom left corner and choose save as PDF…

- No compression applied to JPEGs as far as I can tell.
- No options to set resolution on PDF output as far as I can tell. Output will be at the original resolution of the files stored in MS word on MacOS.
This entry was posted in Illustration, Word Processing and tagged downsampling, embedding, Figures, image formats, images, JPEG, MacOS, MS word, optimising, PDF, pixel count, pixel density, PNG, print to pdf, resolution, Tiff by Luke. Bookmark the permalink.


One comment on “Handling images in MS word mac 2011”
Nice article! I have the same issue that I was trying to save the word file as a pdf file but I couldn’t. You have solved my problem. Thank you!