Organising your papers in Blackboard
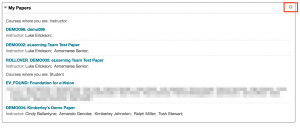
You might have noticed in the last week of the year we’ve added a new feature to your My Papers module on Blackboard.
This new Settings Wheel will allow you to edit what is displayed in this module, and in what order.
Here you can choose what is displayed for each paper, or if in fact you want to display that paper at all. Note: You must display the Course Name.
On the left there is an area where you can alter the order your papers appear in.
Landing Pages – Blackboard
I’ve been out and about for the last week or so doing one-on-one user acceptance testing and in each session I inevitably get asked a Blackboard question. This little tip is the answer to one such question.
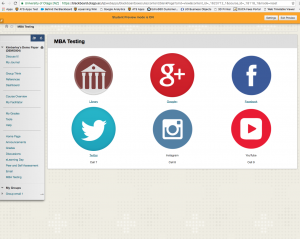
Most users of technology are now very used to the idea of a landing screen filled with a grid of icons that open various applications and websites – just like a smartphone or tablet. The user in question wanted to create a grid of links to items useful for a course of distance students who have never been on a University of Otago campus. Links would include the Library, Distance Learning office and lots of other useful things to help students find their place in the world.
 After thinking about this request for a while I realised there is a simple (not necessarily elegant) solution to achieve this in Blackboard. The solution needed to be something any user could create and maintain – so a whole load of complicated coding was out of the question. What follows are instructions to create a Blank Page in your Blackboard paper, create a table of icons (or images) which are also links. There are also instructions to make this page your default Home page for your paper.
- Log into Blackboard and open your paper.
- Go to the + symbol on the top left of your course menu and click it.
- Select Blank Page from the drop-down menu.
- Give the page a name – perhaps Home.
- Add a table to the content (it’s a grid icon on the bottom row).
- Select the number of rows and columns you want (I opted for 3 by 3), set the height and width to 100%, leave the border at 0.
- Insert an image (if you want one) into each cell. In the Appearance tab of the Insert image page set some dimensions – I opted for 200px by 200px for every image to keep it consistent and neat.
- Under the image add a title for the link for example Library.
- Highlight both your text and image and click the make link icon (it’s the chain like icon in the middle row). Add the full URL to the Link Path and set the target to ‘Open in a new window’.
- While the image and text are highlighted centre them.
- Repeat steps 7-10 until the whole table is full (or you’ve run out of links).
- Click Submit
- Turn Edit mode off (top right hand of the page) to see what you page now looks like.
To make this page the default start page for your Blackboard paper:
- While logged into your paper go to Teaching Style in the Customisation section of your Control Panel (bottom left hand menu).
- Scroll down to ‘Select course entry point’ and select the page you created above.
- Click Submit
Testers, Testers – read all about it!
Calling all Blackboard users, administrators and gurus – I have an offer too good to be true. For many months I have been planning a new application to help administer Blackboard papers. Currently the system is a very manual one where users for example request a rollover of their paper, that request is emailed to the ITS Service Desk, who log the request and send it to the ITS Blackboard Administration team who in turn manually add all the information you sent through into another system. That’s at least 3 systems and a whole load of manual copying and pasting – over 60 clicks to be precise.
Drum roll please.
eLearning alongside the Application Development team have been slaving away to build the new Blackboard Paper Administration application which will let you manage your own papers. Request rollovers and have them complete within 15 minutes or request a new paper and have that in Blackboard in 15 minutes. Now, before everyone gets to experience this change I’d like to get some real testing done to make sure everything is as easy to use and understand as I’d like it to be. This is where you all come in – if you’re interested in helping out with the testing please fill in the form below. I am hoping to run a focus group session of about an hour (2pm Friday 2 December) and some one-on-one sessions where you get to use the new system and tell me what you think about it and what might benefit from some alterations.


